这篇文章总字数为:12988 字,有 17 张图存于本站服务器
首先,这是一个作业
其次,作业截止时间请看上面活动倒计时。
效果图:
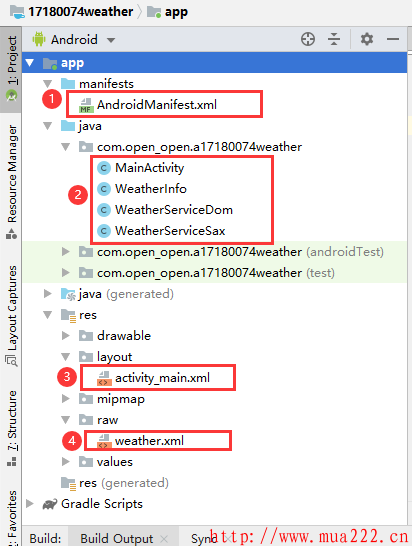
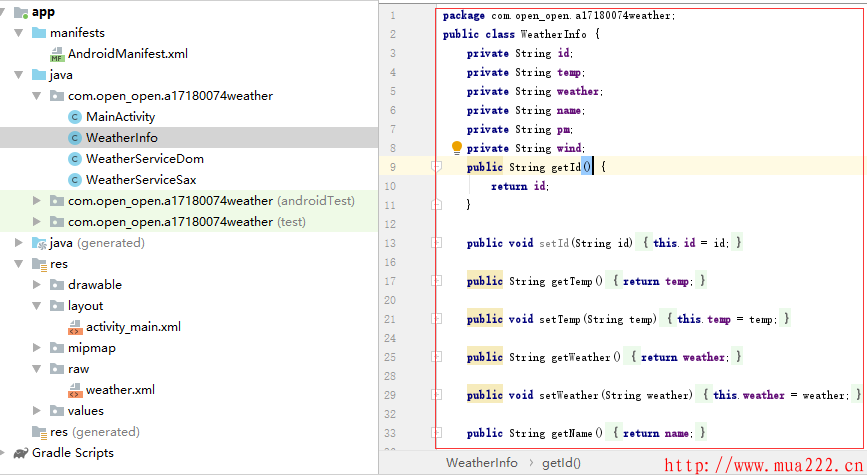
上代码前得看一下文件结构
文件结构图:
第一步新建activity_main.xml文件
文件路径:res/layout/
<RelativeLayout xmlns:android="http://schemas.android.com/apk/res/android"
    xmlns:tools="http://schemas.android.com/tools"
    android:layout_width="match_parent"
    android:layout_height="match_parent"
    android:background="@drawable/weather"
    tools:context=".MainActivity">
    <TextView
        android:id="@+id/tv_city"
        android:layout_width="wrap_content"
        android:layout_height="wrap_content"
        android:layout_alignEnd="@+id/tv_weather"
        android:layout_alignParentTop="true"
        android:layout_alignRight="@+id/tv_weather"
        android:layout_marginTop="39dp"
        android:text="上海"
        android:textSize="50sp"/>
    <ImageView
        android:id="@+id/iv_icon"
        android:layout_width="70dp"
        android:layout_height="70dp"
        android:layout_alignLeft="@+id/ll_btn"
        android:layout_alignStart="@+id/ll_btn"
        android:layout_below="@+id/tv_city"
        android:layout_marginLeft="44dp"
        android:layout_marginStart="44dp"
        android:layout_marginTop="42dp"
        android:paddingBottom="5dp"
        android:src="@mipmap/ic_launcher"/>
    <TextView
        android:id="@+id/tv_weather"
        android:layout_width="wrap_content"
        android:layout_height="wrap_content"
        android:layout_alignRight="@+id/iv_icon"
        android:layout_below="@+id/iv_icon"
        android:layout_marginRight="15dp"
        android:layout_marginTop="18dp"
        android:gravity="center"
        android:text="多云"
        android:textSize="18sp"/>
    <LinearLayout
        android:layout_width="wrap_content"
        android:layout_height="wrap_content"
        android:layout_alignTop="@+id/iv_icon"
        android:layout_marginLeft="39dp"
        android:layout_marginStart="39dp"
        android:layout_toEndOf="@+id/iv_icon"
        android:layout_toRightOf="@+id/iv_icon"
        android:gravity="center"
        android:orientation="vertical">
        <TextView
            android:id="@+id/tv_temp"
            android:layout_width="wrap_content"
            android:layout_height="wrap_content"
            android:layout_marginTop="10dp"
            android:gravity="center_vertical"
            android:text="-7℃"
            android:textSize="22sp"/>
        <TextView
            android:id="@+id/tv_wind"
            android:layout_width="wrap_content"
            android:layout_height="wrap_content"
            android:text="风力:3级"
            android:textSize="18sp"/>
        <TextView
            android:id="@+id/tv_pm"
            android:layout_width="73dp"
            android:layout_height="wrap_content"
            android:text="pm"
            android:textSize="18sp"/>
    </LinearLayout>
    <LinearLayout
        android:id="@+id/ll_btn"
        android:layout_width="wrap_content"
        android:layout_height="wrap_content"
        android:layout_alignParentBottom="true"
        android:layout_centerHorizontal="true"
        android:orientation="horizontal">
        <Button
            android:id="@+id/btn_bj"
            android:layout_width="wrap_content"
            android:layout_height="wrap_content"
            android:text="北京"/>
        <Button
            android:id="@+id/btn_sh"
            android:layout_width="wrap_content"
            android:layout_height="wrap_content"
            android:text="上海"/>
        <Button
            android:id="@+id/btn_gz"
            android:layout_width="wrap_content"
            android:layout_height="wrap_content"
            android:text="广州"/>
    </LinearLayout>
</RelativeLayout>
第二步创建weather.xml文件
文件路径:res/raw/
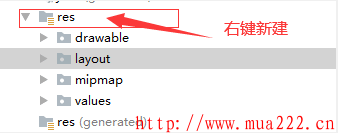
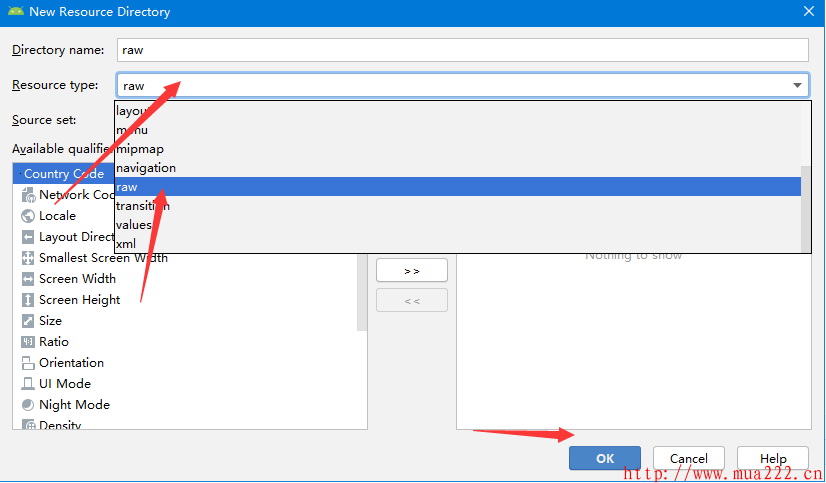
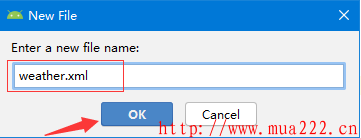
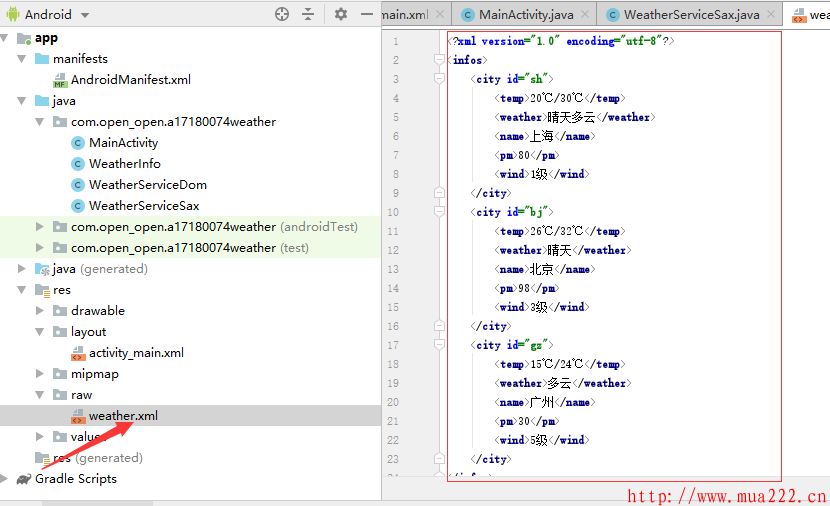
你会不会问raw怎么创建?帮你准备了图解
raw和weather.xml就是这么创建滴,可以复制下面代码了
<?xml version="1.0" encoding="utf-8"?>
<infos>
    <city id="sh">
        <temp>20℃/30℃</temp>
        <weather>晴天多云</weather>
        <name>上海</name>
        <pm>80</pm>
        <wind>1级</wind>
    </city>
    <city id="bj">
        <temp>26℃/32℃</temp>
        <weather>晴天</weather>
        <name>北京</name>
        <pm>98</pm>
        <wind>3级</wind>
    </city>
    <city id="gz">
        <temp>15℃/24℃</temp>
        <weather>多云</weather>
        <name>广州</name>
        <pm>30</pm>
        <wind>5级</wind>
    </city>
</infos>
第三步创建MainActivity.java文件
路径:java/第一个包名/
“这里提醒一下”:.java文件要用自己包名,后面所有.java文件都要用自己包名,别把我包名都copy走啦,包名如下图所示。
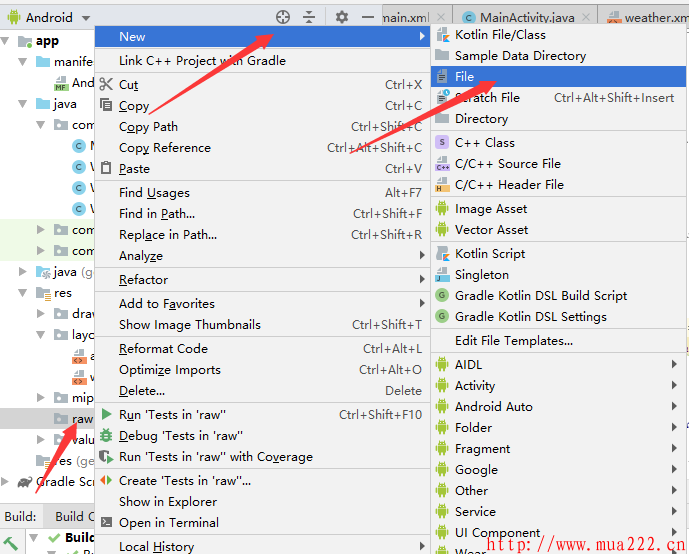
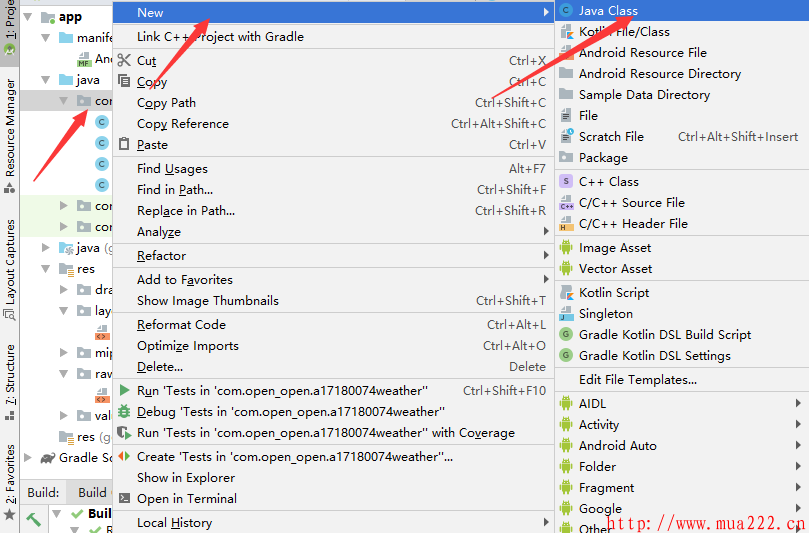
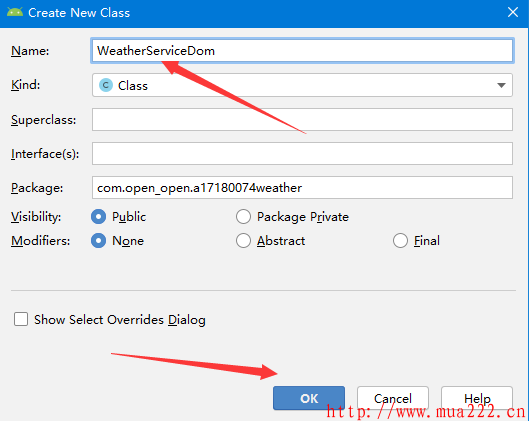
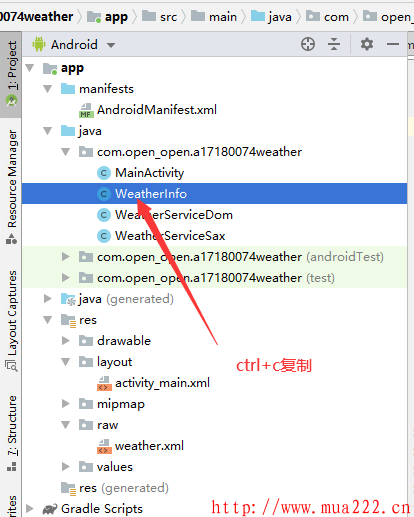
什么?.java文件怎么建?没关系,给你准备好了!
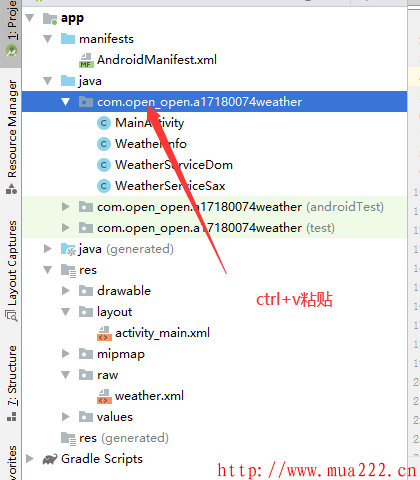
图解如下所示。
其实还有个便捷小妙招,
什么?不早说?
毕竟不符合正常规范,就是复制已有的文件,粘贴出来再改内容,此办法适合所有类型文件----“懒人专用”
奥里给!继续上代码
package com.open_open.a17180074weather;

import android.os.Bundle;
import androidx.appcompat.app.AppCompatActivity;
import android.view.View;
import android.widget.ImageView;
import android.widget.TextView;
import android.widget.Toast;
import java.io.InputStream;
import java.util.ArrayList;
import java.util.HashMap;
import java.util.List;
import java.util.Map;
public class MainActivity extends AppCompatActivity implements
        View.OnClickListener {
    private TextView tvCity;
    private TextView tvWeather;
    private TextView tvTemp;
    private TextView tvWind;
    private TextView tvPm;
    private ImageView ivIcon;
    private Map<String, String> map;
    private List<Map<String, String>> list;
    private String temp, weather, name, pm, wind;
    @Override
    protected void onCreate(Bundle savedInstanceState) {
        super.onCreate(savedInstanceState);
        setContentView(R.layout.activity_main);
        // 初始化文本控件
        initView();
        try {
            //读取weather1.xml文件
            InputStream is = this.getResources().openRawResource(R.raw.weather);
            //把每个城市的天气信息集合存到weatherInfos中
            List<WeatherInfo> weatherInfos = WeatherServiceDom.getInfosFromXML(is);
            //List<WeatherInfo> weatherInfos = WeatherServiceSax.getInfosFromXML();
            //循环读取weatherInfos中的每一条数据
            list = new ArrayList<Map<String, String>>();
            for (WeatherInfo info : weatherInfos) {
                map = new HashMap<String, String>();
                map.put("temp", info.getTemp());
                map.put("weather", info.getWeather());
                map.put("name", info.getName());
                map.put("pm", info.getPm());
                map.put("wind", info.getWind());
                list.add(map);
            }
        } catch (Exception e) {
            e.printStackTrace();
            Toast.makeText(this, "解析信息失败", Toast.LENGTH_SHORT).show();
        }
        //自定义getMap()方法,显示天气信息到文本控件中,默认显示北京的天气
        getMap(1, R.drawable.sun);
    }
    private void initView() {
        tvCity = (TextView) findViewById(R.id.tv_city);
        tvWeather = (TextView) findViewById(R.id.tv_weather);
        tvTemp = (TextView) findViewById(R.id.tv_temp);
        tvWind = (TextView) findViewById(R.id.tv_wind);
        tvPm = (TextView) findViewById(R.id.tv_pm);
        ivIcon = (ImageView) findViewById(R.id.iv_icon);
        findViewById(R.id.btn_sh).setOnClickListener(this);
        findViewById(R.id.btn_bj).setOnClickListener(this);
        findViewById(R.id.btn_gz).setOnClickListener(this);
    }
    @Override
    public void onClick(View v) {    //按钮的点击事件
        switch (v.getId()) {
            case R.id.btn_sh:
                getMap(0, R.drawable.cloud_sun);
                break;
            case R.id.btn_bj:
                getMap(1, R.drawable.sun);
                break;
            case R.id.btn_gz:
                getMap(2, R.drawable.clouds);
                break;
        }
    }
    //将城市天气信息分条展示到界面上
    private void getMap(int number, int iconNumber) {
        Map<String, String> cityMap = list.get(number);
        temp = cityMap.get("temp");
        weather = cityMap.get("weather");
        name = cityMap.get("name");
        pm = cityMap.get("pm");
        wind = cityMap.get("wind");
        tvCity.setText(name);
        tvWeather.setText(weather);
        tvTemp.setText("" + temp);
        tvWind.setText("风力  : " + wind);
        tvPm.setText("pm: " + pm);
        ivIcon.setImageResource(iconNumber);
    }
}
第四步创建WeatherInfo.java文件
路径:java/第一个包名/
package com.open_open.a17180074weather;
public class WeatherInfo {
    private String id;
    private String temp;
    private String weather;
    private String name;
    private String pm;
    private String wind;
    public String getId() {
        return id;
    }

    public void setId(String id) {
        this.id = id;
    }

    public String getTemp() {
        return temp;
    }

    public void setTemp(String temp) {
        this.temp = temp;
    }

    public String getWeather() {
        return weather;
    }

    public void setWeather(String weather) {
        this.weather = weather;
    }

    public String getName() {
        return name;
    }

    public void setName(String name) {
        this.name = name;
    }

    public String getPm() {
        return pm;
    }

    public void setPm(String pm) {
        this.pm = pm;
    }

    public String getWind() {
        return wind;
    }

    public void setWind(String wind) {
        this.wind = wind;
    }
    @Override
    public String toString(){
        System.out.println("id:"+getId()+"temp:"+getTemp()+"name:"+getName()+"pm:"+getPm()+"weather"+getWeather()+"wind:"+getWind());
        return null;
    }
}
第五步创建WeatherServiceDom.java文件
路径:java/第一个包名/
package com.open_open.a17180074weather;

import org.w3c.dom.Document;
import org.w3c.dom.Element;
import org.w3c.dom.NodeList;
import org.xml.sax.SAXException;

import java.io.IOException;
import java.io.InputStream;
import java.util.ArrayList;
import java.util.List;

import javax.xml.parsers.DocumentBuilder;
import javax.xml.parsers.DocumentBuilderFactory;
import javax.xml.parsers.ParserConfigurationException;

public class WeatherServiceDom {
    public static List<WeatherInfo> getInfosFromXML (InputStream is) throws ParserConfigurationException, IOException, SAXException {
        List<WeatherInfo> weatherInfos = null;
        WeatherInfo weatherInfo = null;
        //建立DocumentBuilderFactor,用于获得DocumentBuilder对象:
        DocumentBuilderFactory factory = DocumentBuilderFactory.newInstance();
        //2.建立DocumentBuidler:
        DocumentBuilder builder = factory.newDocumentBuilder();
        //3.建立Document对象,获取树的入口:
        Document doc = builder.parse(is);
        //4.建立NodeList:
        NodeList node = doc.getElementsByTagName("city");
        weatherInfos = new ArrayList<WeatherInfo>();
        //5.进行xml信息获取
        for(int i=0;i<node.getLength();i++){
            Element e = (Element)node.item(i);
            weatherInfo=new WeatherInfo();
            //String id=e.getAttribute("id");
            //weatherInfo.setId(id);
            String temp=e.getElementsByTagName("temp").item(0).getFirstChild().getNodeValue();
            weatherInfo.setTemp(temp);
            String weather=e.getElementsByTagName("weather").item(0).getFirstChild().getNodeValue();
            weatherInfo.setWeather(weather);
            String name=e.getElementsByTagName("name").item(0).getFirstChild().getNodeValue();
            weatherInfo.setName(name);
            String pm=e.getElementsByTagName("pm").item(0).getFirstChild().getNodeValue();
            weatherInfo.setPm(pm);
            String wind=e.getElementsByTagName("wind").item(0).getFirstChild().getNodeValue();
            weatherInfo.setWind(wind);
            weatherInfos.add(weatherInfo);
        }
        weatherInfo.toString();
        return weatherInfos;
    }
}
第六步创建WeatherServiceSax.java文件
路径:java/第一个包名/
package com.open_open.a17180074weather;

import android.util.Log;
import org.xml.sax.Attributes;
import org.xml.sax.SAXException;
import org.xml.sax.helpers.DefaultHandler;
import java.io.IOException;
import java.util.ArrayList;
import java.util.List;

import javax.xml.parsers.ParserConfigurationException;
import javax.xml.parsers.SAXParser;
import javax.xml.parsers.SAXParserFactory;

public class WeatherServiceSax {
    //创建一个LIst容器存放WeatherInfo对象
    static List<WeatherInfo> weatherInfos = null;
    //存放标签名
    static String tagName=null;
    //定义一个对象
    static WeatherInfo weatherInfo = null;

    public static List<WeatherInfo> getInfosFromXML () throws ParserConfigurationException, SAXException, IOException {

        //1.先创建解析器工厂
        SAXParserFactory factory = SAXParserFactory.newInstance();
        //2.利用工厂创建一个解析器
        SAXParser saxParser = factory.newSAXParser();
        //3.调用解析方法,解析文件,该方法有两个参数,第一个参数是要解析的文件,第二个参数是处理类
        try{
            saxParser.parse("raw/weather1.xml",new MyDefaultHandler());
        }catch(SAXException e){
            e.printStackTrace();
        }
        return weatherInfos;
    }
    static class MyDefaultHandler extends DefaultHandler {

        @Override
        public void startDocument()throws SAXException{
            Log.v("sax","startDocument开始解析...");
            weatherInfos = new ArrayList<WeatherInfo>();
        }
        @Override
        public void endDocument() throws SAXException {
            Log.v("sax","endDocument解析完毕...");
        }
        //开始标签
        @Override
        public void startElement(String uri, String localName, String qName, Attributes attributes) throws SAXException {
            if(qName.equals("city")) {                 //拿到一个Employee对象
                weatherInfo = new WeatherInfo();                 //就创建一个对象
                String id = attributes.getValue("id");     //获取属性值
            }else {
                tagName = qName;
            }
        }
        //解析一个weatherInfo结束标签
        @Override
        public void endElement(String uri, String localName, String qName) throws SAXException {

            if(qName.equals("city")) {    //此时说明一个对象已经解析完,我们就将当前对象存放到容器中
                weatherInfos.add(weatherInfo);
            }else {
                //因为SAX解析也会识别空文本,所以每次遇到尾标签,需要将tagName值空,避免,将当前的值被空文本给覆盖掉
                tagName = null;
            }
        }
        //当前文本内容
        @Override
        public void characters(char[] ch, int start, int length) throws SAXException {
            //构建当前读取到文本内容
            String msg = new String(ch,start,length);
            //tagName存放这当前的qName,判断当前拿取到的是哪个值
            if(tagName.equals("temp")) {
                weatherInfo.setTemp(msg);
            }else if(tagName.equals("weather")) {
                weatherInfo.setWeather(msg);
            }else if(tagName.equals("name")) {
                weatherInfo.setName(msg);
            }else if(tagName.equals("pm")) {
                weatherInfo.setPm(msg);
            }else if(tagName.equals("wind")) {
                weatherInfo.setWind(msg);
            }
        }

    }
}
第七步创建AndroidManifest.xml文件
路径:app/manifests/,这里再次提醒,第四行package="com.open_open.a17180074weather"不要用我的,不要copy我的包名,否则,运行失败!!!
<?xml version="1.0" encoding="utf-8"?>
<manifest xmlns:android="http://schemas.android.com/apk/res/android"
    xmlns:dist="http://schemas.android.com/apk/distribution"
    package="com.open_open.a17180074weather">
    <dist:module dist:instant="true" />
    <application
        android:allowBackup="true"
        android:icon="@mipmap/ic_launcher"
        android:label="@string/app_name"
        android:roundIcon="@mipmap/ic_launcher_round"
        android:supportsRtl="true"
        android:theme="@style/AppTheme">
        <activity android:name=".MainActivity">
            <intent-filter>
                <action android:name="android.intent.action.MAIN" />
                <category android:name="android.intent.category.LAUNCHER" />
            </intent-filter>
        </activity>
        <activity android:name=".WeatherInfo">
        <intent-filter>
            <action android:name="android.intent.action.MAIN" />
            <category android:name="android.intent.category.LAUNCHER" />
        </intent-filter>
    </activity>
        <activity android:name=".WeatherServiceDom">
            <intent-filter>
                <action android:name="android.intent.action.MAIN" />
                <category android:name="android.intent.category.LAUNCHER" />
            </intent-filter>
        </activity>
        <activity android:name=".WeatherServiceSax">
            <intent-filter>
                <action android:name="android.intent.action.MAIN" />
                <category android:name="android.intent.category.LAUNCHER" />
            </intent-filter>
        </activity>
    </application>

</manifest>
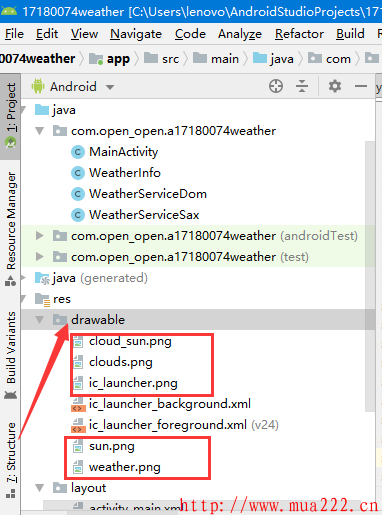
第八步把下载的附件中资源图片导入
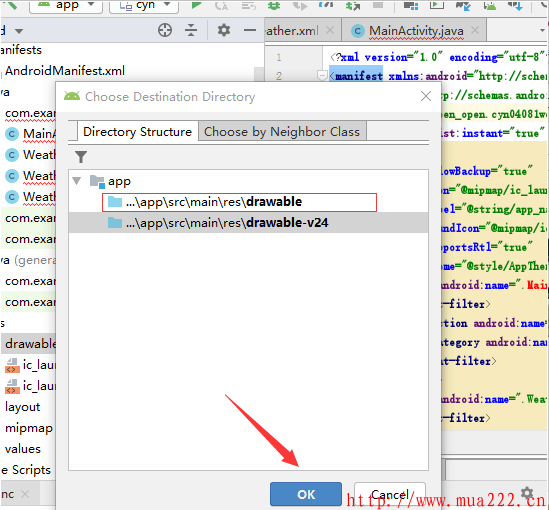
全选图片ctrl+c复制,打开AS中左侧文件栏资源文件夹
路径是res/drawable/
点击文件夹drawable,ctrl+v粘贴图片,导入成功。
图片演示:
源码word文件和图片资源文件我已经打包好了,
下载附件就可以带走啦。
写教程不易!该附件评论后刷新页面可下载,多谢支持!!!
如何快捷评论?
输入QQ号系统自动获取资料,
输入评语,点击发表。









评论